Have you ever got bored of clicking the apps in your Windows? If yes, then there’s an alternative way to avoid the clicks in your system is the Keyboard Shortcuts. Also, these Shortcuts are called Hotkeys. By using these Hotkeys or Shortcuts, you can save your time just by pressing a combination of keys on your keyboard. Regarding these Keyboard Shortcuts, Windows 10 made it easy, every user can customize or create their own Shortcuts or Hotkeys to open any applications. There are two ways to implement keyboard shortcuts on Windows 10. For your better understanding, this article will show you the procedures to create keyboard shortcuts on Windows 10. If you want to know some of the best Keyboard shortcuts, then visit the below-mentioned table.

Table of Contents
Did you know?
What are the uses of Keyboard Shortcuts?
Normally, shortcuts are made to reduce the work. Similarly, Keyboard shortcuts will help you to save time rather than moving your mouse cursor and making time longer. Apart from this, there are also many advantages to keyboard shortcuts. They enhance our keyboard skills, efficient use of the keyboard, etc. To have keyboard shortcuts in your Windows 10 system, all you need to know, are the steps to create them and to remember what you’ve entered as a shortcut key. And in that way, this article helps you just by clearing the steps to create the Keyboard shortcuts on Windows 10. Two ways to implement keyboard shortcuts on Windows 10, here is the first method to create keyboard shortcuts on Windows 10.
1. Using StartBar:
- First of all, click the start icon in your System.
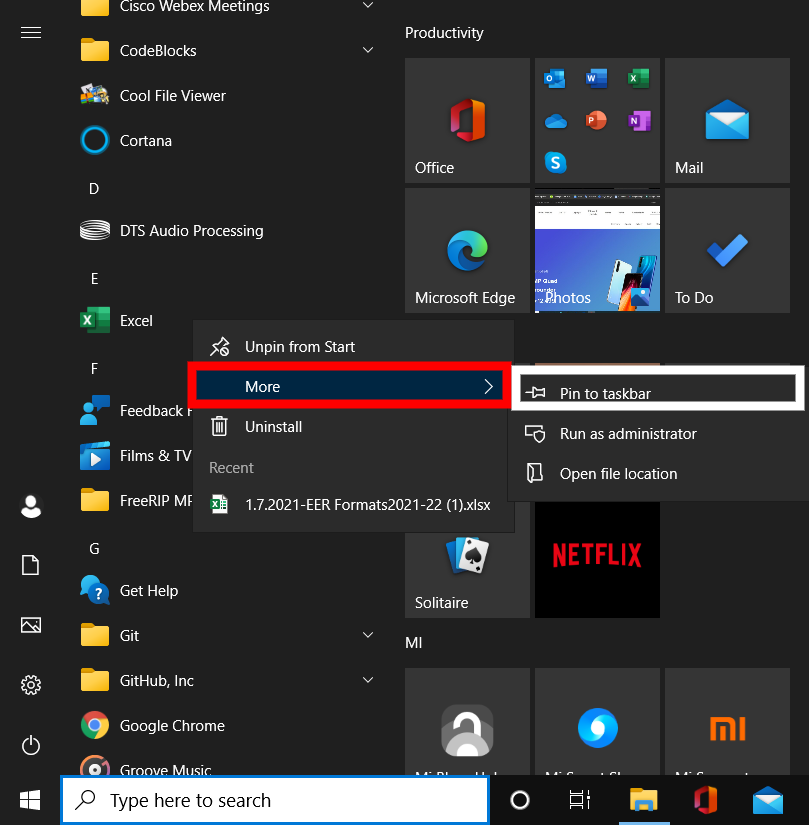
- Then, in the start bar, decide any software which you want to create a shortcut. Now, right click the software and select the option “More“.
- After that, once again select the option called “Pin to taskbar“.
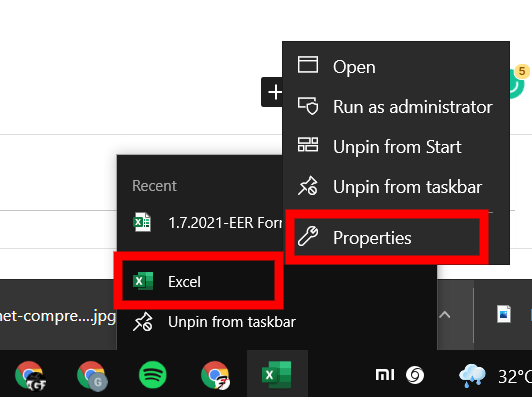
- If your selected software is pinned to the taskbar, then make a right click on the software and once again make a right click on the name of the software. After that, click “properties” option.Advertisement
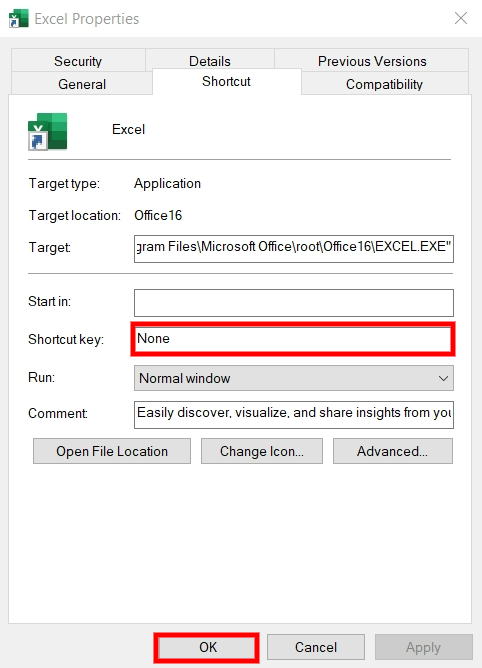
- In properties, by default, you’ll be shown the shortcut page. In that, give the shortcut just by pressing “CTRL + ALT + letter”. Similarly, you can do for the remaining software which you want to create shortcuts.
2. By using Command Prompt (CMD):
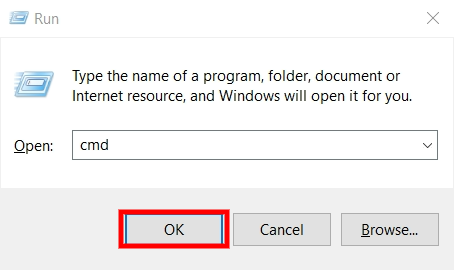
- At first, open Command Prompt in your system. For this, press “start button + letter R” in your keyboard. Then, enter “cmd” in the text box and click “OK” button.

- Now, after opening cmd in your system, copy paste these words “explorer shell:AppsFolder” in the command prompt(cmd).
- After typing the words, press the “Enter” button. Once you clicked the enter button, a new folder will be opened. In that, there will be apps that are installed in your system.
- Then, from that list of apps, choose any one app and right-click the app. After that, choose the option “Create Shortcut”.
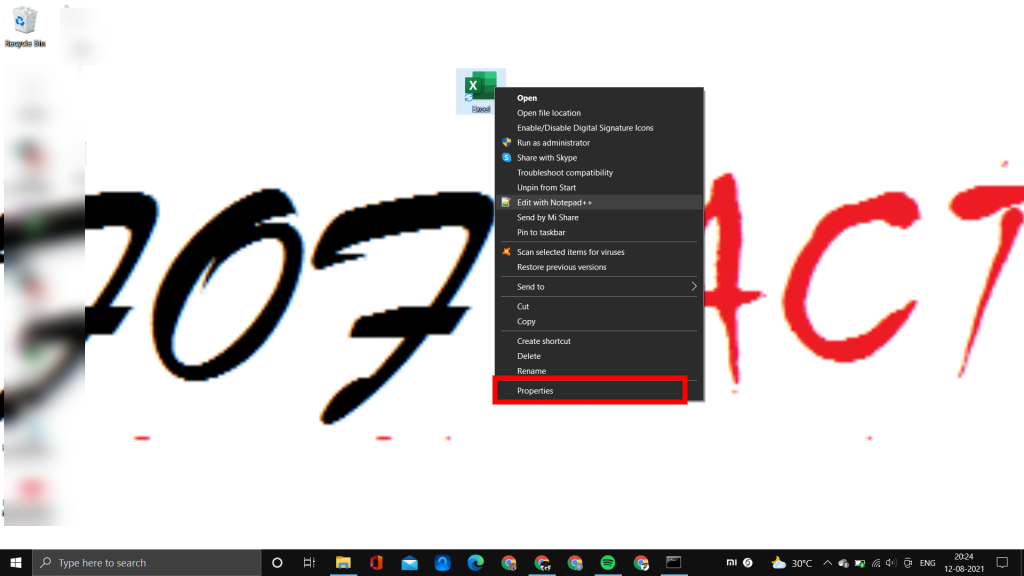
- Once you created the shortcut, the icon will get placed in your desktop. Now, in the desktop , right-click the app which you want to create a shortcut and select the option named “Properties“.Advertisement
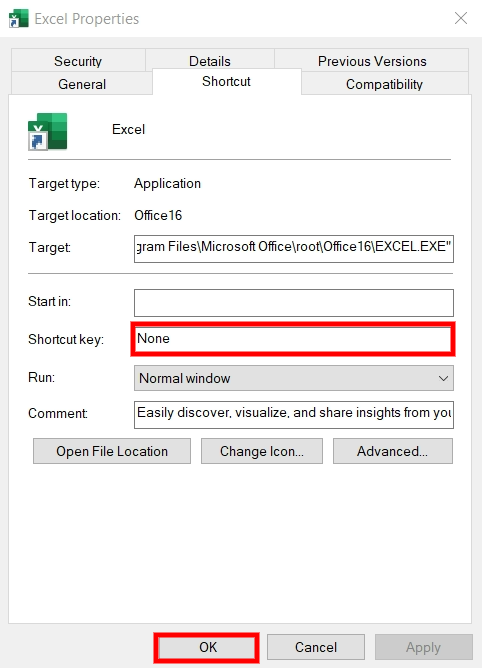
- In properties, by default, you’ll be shown a shortcut page and in that, you need to give your shortcut key just by entering the combination of keys like “CTRL + ALT + letter“. Finally, click apply and select OK option to create a new shortcut.
Summary
Here’s the conclusion of the article. The process to create or customize the keyboard shortcuts on Windows 10 can be executed in two methods. The first method is done by start bar and the second method is done by using Command Prompt. Both the ways will have a similar conclusion, but the starting alone differs. Things to be remembered are the shortcut you’ve given, and if you’ve forgotten the shortcut, you can also remember them in the same way. And that’s it, follow up the above-mentioned methods to create keyboard shortcuts on Windows 10.


Hello. This is Good Post
Hello people. A good piece of the message.
Fascinating!!
Great post